Quotation templates
Reusable quotation templates can be made in Odoo’s Sales app for common products or services.
By using these templates, quotations can be tailored and sent to customers at a quicker pace, without having to create new quotations from scratch every time a sales negotiation occurs.
Configuration
To use quotation templates, begin by activating the setting in , and scroll to the Quotations _Orders heading.
Under the heading, tick the Quotation Templates checkbox. Doing so reveals a new Default Template field, in which a default quotation template can be chosen from the drop-down menu.
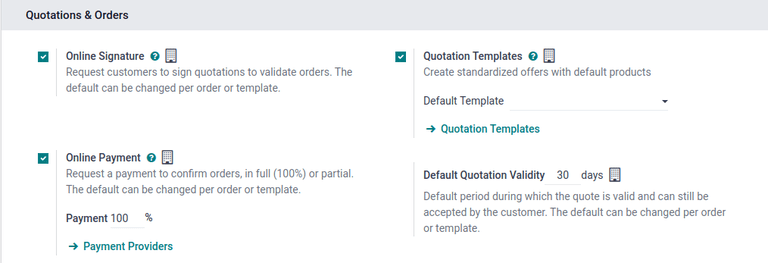
Upon activating the Quotation Template feature, an internal Quotation Templates link appears beneath the Default Template field.
Clicking this link reveals the Quotation Templates page, from which templates can be created, viewed, and edited.
Before leaving the Settings page, do not forget to click the Save button to save all changes made during the session.
Create quotation templates
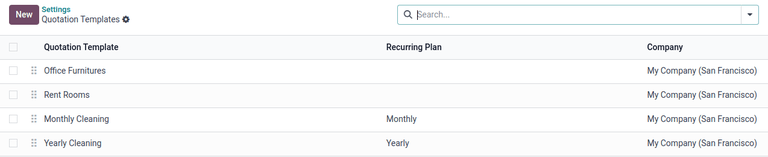
To create a quotation template, click the Quotation Templates link on the Settings page once Quotation templates are enabled, or navigate to . Both options reveal the Quotation Templates page, where quotation templates can be created, viewed, and edited.
To create a new quotation template, click the New button, located in the upper-left corner. Doing so reveals a blank quotation template form that can be customized.
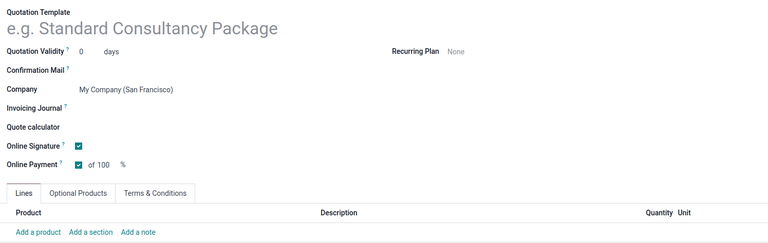
Start by entering a name for the template in the Quotation Template field.
Then, in the Quotation Validity field, designate how many days the quotation template
will remain valid for, or leave the field on the default 0 to keep the template valid
indefinitely.
Next, in the Confirmation Mail field, click the blank drop-down menu to select a preconfigured email template to be sent to customers upon confirmation of an order.
Tip
To create a new email template directly from the Confirmation Mail field, start typing the name of the new email template in the field, and select either: Create or Create and edit… from the drop-down menu that appears.
Selecting Create creates the email template, which can be edited later.
Selecting Create and edit… creates the email template, and a Create Confirmation Mail pop-up window appears, in which the email template can be customized and configured immediately.
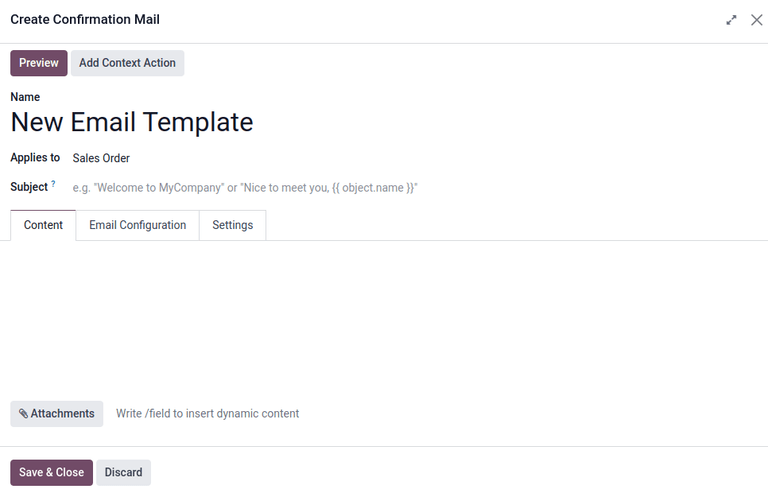
When all modifications are complete, click Save & Close to save the email template and return to the quotation form.
If working in a multi-company environment, use the Company field to designate to which company this quotation template applies.
If a journal is set in the Invoicing Journal field, all sales orders with this template will invoice in that specified journal. If no journal is set in this field, the sales journal with the lowest sequence is used.
If the Online Signature and/or Online Payment features are activated in the Settings (), those options are available on quotation template forms.
Check the box beside Online Signature to request an online signature from the customer to confirm an order.
Check the box beside Online Payment to request an online payment from the customer to confirm an order. When Online Payment is checked, a new percentage field appears, in which a specific percentage of payment can be entered.
Both options, Online Signature and Online Payment can be enabled simultaneously, in which case the customer must provide both a signature and a payment to confirm an order.
In the Recurring Plan field, choose from a variety of pre-configured amounts of time (e.g. Monthly, Quarterly, etc.) to designate how often this quotation template should occur.
Note
The Recurring Plan field only applies to subscription plans. For more information, check out the documentation on Subscription plans.
Lines tab
In the Lines tab, products can be added to the quotation template by clicking Add a product, organized by clicking Add a section (and dragging/dropping section headers), and further explained with discretionary information (such as warranty details, terms, etc.) by clicking Add a note.
To add a product to a quotation template, click Add a product in the Lines tab of a quotation template form. Doing so reveals a blank field in the Product column.
When clicked, a drop-down menu with existing products in the database appears. Select the desired product from the drop-down menu to add it to the quotation template.
If the desired product is not readily visible, type the name of the desired product in the Product field, and the option appears in the drop-down menu. Products can also be found by clicking Search More… from the drop-down menu.
Tip
It is possible to add event-related products (booths and registrations) to quotation templates.
To do so, click the Product field, type in Event, and select the desired
event-related product from the resulting drop-down menu.
Note
When a product is added to a quotation template, the default Quantity is 1, but
that can be edited at any time.
Then, drag and drop the product to the desired position, via the six squares icon, located to the left of each line item.
To add a section, which serves as a header to organize the lines of a sales order, click Add a section in the Lines tab. When clicked, a blank field appears, in which the desired name of the section can be typed. When the name has been entered, click away to secure the section name.
Then, drag and drop the section name to the desired position, via the (six squares) icon, located to the left of each line item.
To add a note, which appears as a piece of text for the customer on the quotation, click Add a note in the Lines tab. When clicked, a blank field appears, in which the desired note can be typed. When the note has been entered, click away to secure the note.
Then, drag and drop the note to the desired position, via the (six squares) icon.
To delete any line item from the Lines tab (product, section, and/or note), click the (remove record) icon on the far-right side of the line.
Optional Products tab
Using optional products is a marketing strategy that involves the cross-selling of products along with a core product. The aim is to offer useful and related products to customers, which may result in an increased sale.
Example
If a customer wants to buy a car, they have the choice to order massaging seats as an additional product that compliments the car, or ignore the offer and buy the car alone.
Optional products appear as a section on the bottom of sales orders and eCommerce pages. Customers can immediately add them to their online sales orders themselves, if desired.

In the Optional Products tab, Add a line for each cross-selling product related to the original items in the Lines tab, if applicable.
Clicking Add a line reveals a blank field in the Product column.
When clicked, a drop-down menu with products from the database appear. Select the desired product from the drop-down menu to add it as an optional product to the quotation template.
To delete any line item from the Optional Products tab, click the (remove record) icon.
Note
Optional products are not required to create a quotation template.
Terms & Conditions tab
The Terms & Conditions tab provides the opportunity to add terms and conditions to the quotation template. To add terms and conditions, type the desired terms and conditions in this tab.
Note
Terms and conditions are not required to create a quotation template.
Use quotation templates
When creating a quotation (), choose a preconfigured template in the Quotation Template field.
Note
The order of the templates in the Quotation Template field is determined by the order of the templates in the Quotation Templates form. The order of the quotations in the Quotation Templates form does not affect anything else.
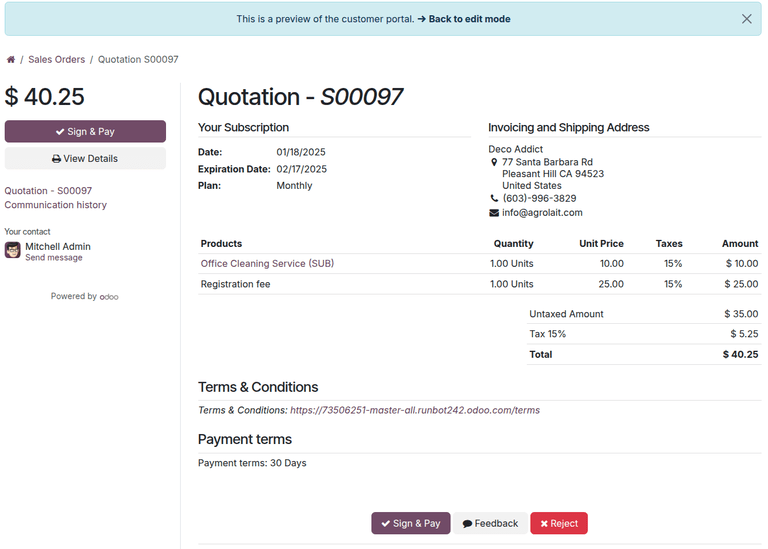
To view what the customer will see, click the Preview button at the top of the page to see how the quotation template appears on the front-end of the website through Odoo’s customer portal.
When all blocks and customizations are complete, click the Save button to save the configuration.
The blue banner located at the top of the quotation template preview can be used to quickly return Back to edit mode. When clicked, Odoo returns to the quotation form in the back-end of the Sales application.
Mass cancel quotations/sales orders
Cancel multiple quotations (or sales orders) by navigating to the dashboard, landing, by default, in the list view. Then, on the left side of the table, tick the checkboxes for the quotations to be canceled.
Tip
Select all records in the table by selecting the checkbox column header at the top-left of the table; the total number of selected items are displayed at the top of the page.
Then, with the desired quotations (or sales orders) selected from the list view on the Quotations page, click the Actions button to reveal a drop-down menu.
From this drop-down menu, select Cancel quotations.

Note
This action can be performed for quotations in any stage, even if it is confirmed as a sales order.
Upon selecting the Cancel quotations option, a Cancel quotations confirmation pop-up window appears. To complete the cancellation, click the Cancel quotations button.
Note
An error pop-up message appears when attempting to cancel an order for an ongoing subscription that has an invoice.