Expiration dates
In Odoo, expiration dates can be used to manage and track the lifecycles of perishable products, from purchase to sale. Using expiration dates reduces product loss due to unexpected expiry, and helps to avoid sending expired products to customers.
In Odoo, only products that are tracked using lots and serial numbers can be assigned expiration information. Once a lot or serial number has been assigned, an expiration date can be set. This is especially helpful for companies (such as food manufacturers) that consistently, or exclusively, buy and sell perishable products.
See also
Enable expiration dates
To enable the use of expiration dates, go to , and scroll down to the Traceability section. Then, click the checkbox to enable the Lots & Serial Numbers feature.
Once that feature is activated, a new option will appear to enable Expiration Dates. Click that checkbox to enable the feature, and be sure to Save changes.

Tip
Once the Lots & Serial Numbers feature is activated, an additional feature appears to Display Lots & Serial Numbers on Delivery Slips. Activating these features helps with end-to-end traceability, making it easier to manage product recalls, identify batches of faulty products, and more.
Configure expiration dates on products
Once the Lots & Serial Numbers and Expiration Dates features have been enabled in the Inventory app settings, expiration information can be configured on individual products.
To do so, go to , and select a product to edit. Selecting a product reveals the product form for that particular item.
Important
To be tracked using lots or serial numbers, or to configure expiration information, products must have their Product Type set as Goods under the General Information tab. Then, in the Track Inventory field, select either By Unique Serial Number or By Lots.
Then, click the Inventory tab, and scroll down to the Traceability section. Tick the Expiration Date checkbox.
Note
If a product has stock on-hand prior to activating tracking by lots or serial numbers, an inventory adjustment might need to be performed in order to assign lot numbers to the existing stock.
Tip
For processing large quantities of products on receipts or deliveries, it is recommended to track using lots, so multiple products can be traced back to the same lot, if any issues arise.
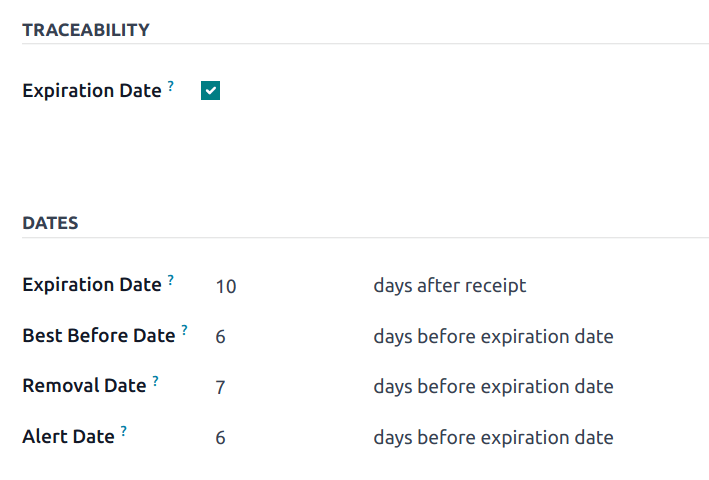
Under the Dates section, there are four categories of expiration information to configure for the product:
Expiration Time: the number of days after receiving products (either from a vendor or in stock after production) in which goods may become dangerous and should not be used or consumed.
Best Before Time: the number of days before the expiration date in which the goods start deteriorating, without being dangerous yet.
Removal Time: the number of days before the expiration date in which the goods should be removed from stock.
Alert Time: the number of days before the expiration date in which an alert should be raised on goods in a particular lot or containing a particular serial number.
Note
The values entered into these fields automatically compute the expiration date for goods entered into stock, whether purchased from a vendor or manufactured in-house.
Tip
If the Dates field is not populated with any values for expiration information, dates (and lots) can be manually assigned upon receipts and deliveries in and out of the warehouse. Even when assigned, they can still be overwritten and changed manually if needed, as well.
Set expiration dates on receipts with lots & serial numbers
Generating expiration dates for incoming goods can be done directly on the Receipt. Navigate to , then click on a line to open the Receipt record.
Important
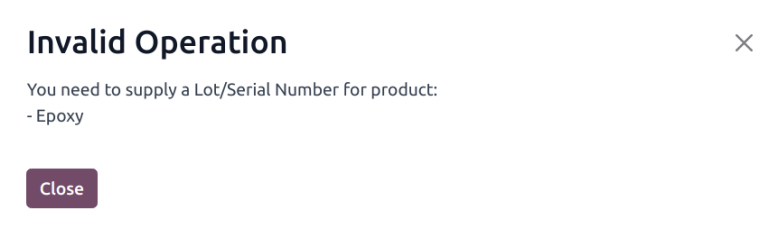
Clicking Validate before assigning a serial number to the ordered product quantities causes a User Error popup to appear. The popup requires entry of a lot or serial number for the ordered products. The receipt cannot be validated without an assigned lot or serial number.
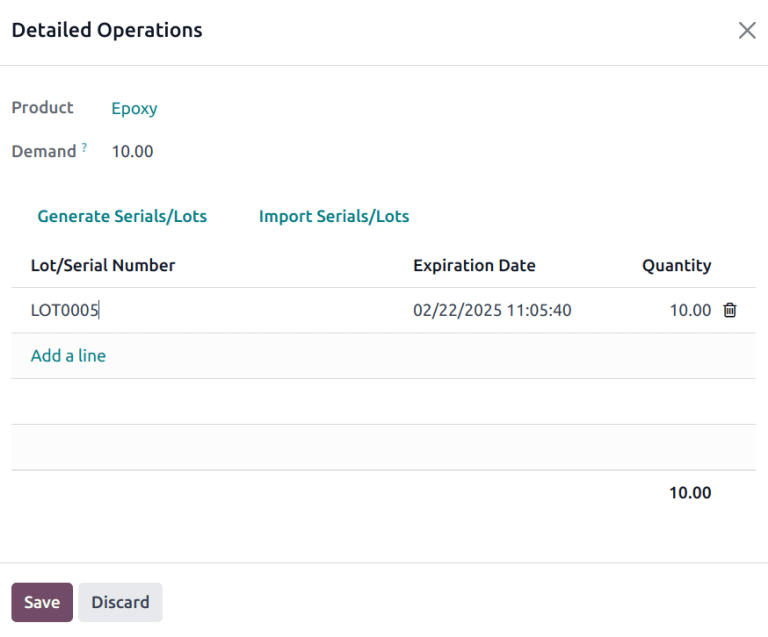
From here, click the (Details) icon located on the of the product line. When clicked, a Detailed Operations pop-up will appear.
In the pop-up, the Expiration Date automatically populates, based on the configuration on the product form. Click the Lot/Serial Number field on the appropriate line, then enter the lot or serial number.
Tip
If the Dates field on the product form has not been configured, the Expiration Date can be manually entered.
Click Save when finished to close the pop-up. Finally, click Validate.
A Traceability smart button will appear upon validating the receipt. Click the Traceability smart button to see the updated Traceability Report, which includes: a Reference document; the Product being traced; the Lot/Serial #; and more.
Set expiration dates on manufactured products
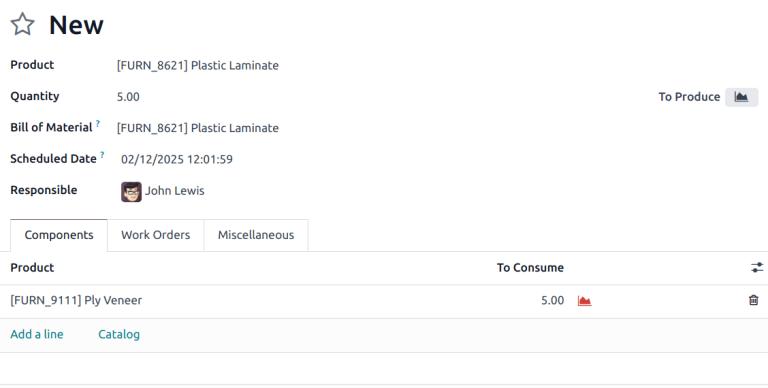
Expiration dates can also be generated for products manufactured in-house. To assign expiration dates to manufactured products, a manufacturing order (MO) needs to be completed.
To create a MO, go to , and click New. Choose a product to manufacture from the Product field drop-down menu, then select the Quantity to produce.
Note
To manufacture a product, there must be materials to consume in the lines in the Product column. This can be achieved either by creating a Bill of Material for the Product, or manually adding materials to consume by clicking Add a line.
Once ready, click Confirm.
The appropriate number of Lots/Serial Numbers automatically populated in the field. Click the (Details) icon to reveal additional information for those specific numbers. On that pop-up, all expiration information that was previously configured for the product is displayed.

Sell products with expiration dates
Selling perishable products with expiration dates is done the same as any other type of product. The first step in selling perishable products is to create a sales order.
To do that, go to to create a new quotation, and fill out the information on the sales order form.
Add a Customer, then click Add a product to add the desired products to the Product lines, and set a Quantity for the products.
Then, click the Other Info tab. Under the Delivery section, change the Delivery Date to a date after the expected date, and click Apply to confirm the date. Finally, click Confirm to confirm the sales order.
Important
If the products are delivered before the Alert Date set on the product form, then no alerts are created.
Next, click the Delivery smart button at the top of the sales order to see the warehouse receipt form.
On the warehouse receipt form, click Validate, and then Apply in the accompanying pop-up window, to automatically process all Done quantities, and deliver the products to the customer.
Important
To sell perishable products with expiration dates, the Removal Strategy for the Location the products are stored in must be set to FEFO. If there is not enough stock of perishable products in one lot, Odoo will automatically take the remaining quantity required from a second lot with the next-soonest expiration date. Removal strategies can also be set on Product Categories.
See also
View expiration dates for lots & serial numbers
To view (and/or group) all products with expiration dates by lot number, go to .
Once there, remove any default search filters from the search bar. Then, click Group By, choose Add Custom Group, and select the Expiration Date parameter from the drop-down menu. Doing so breaks down all perishable products, their expiration dates, and the assigned lot number.

Tip
Customers can also view the expiration date alert in their customer portal.
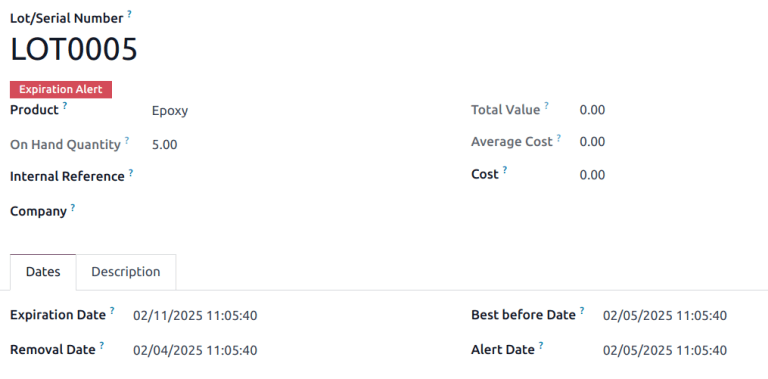
Expiration alerts
To see expiration alerts, go to .
Then, click into a Lot/Serial Number with perishable products. Doing so reveals the serial number detail form.
Tip
To view expiration date information in the list view, click the (adjust settings) icon at the top of the list of records, then tick the Expiration Date checkbox.
On the Lot/Serial Number detail form, the Dates lists all expiration information related to the products.
If the expiration date for a lot/serial number has passed, the form displays a red Expiration Alert at the top of the page to indicate that the products in this lot are either expired or expiring soon.
From here, click back to the Lots/Serial Numbers page (via the breadcrumbs).
To see the new expiration alert, or any expiration alerts for products that are expired (or will expire soon), click back to the Lots/Serial Numbers page via the breadcrumbs. Remove all of the search filters from the search bar on the Lots/Serial Numbers dashboard.
Then, click Filters, and choose Expiration Alerts.
Expiration notifications
Users can be notified when the expiration date for a product has passed. This can help keep specific employees up to date on the status of items under their purview.
To configure a notification, navigate to . Select a product configured with lot/serial numbers and expiration date tracking. Navigate to the Inventory tab. Under the Logistics section, select a user in the Responsible field.
When the expiation date passes for a lot/serial number for this product, a notification is sent to the user in this field.